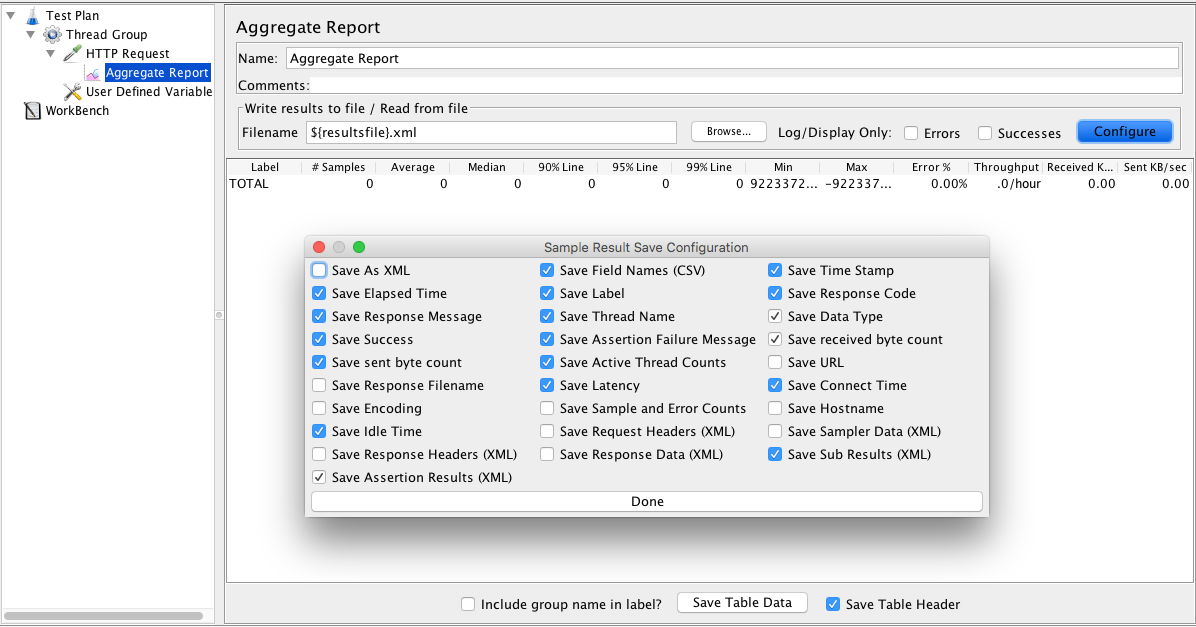
Here are details on how to save or export the results of your Apache JMeter test script to a CSV or XML file.
Setup
1. Open Apache JMeter (here is how to start Apache JMeter on Mac) and right click Test Plan and Add -> Threads (Users) -> Thread Group
2. Right click Thread Group and Add -> Samplers -> HTTP Request
3. Add example.com to the Server input field of the HTTP Request
4. Right click Thread Group and Add -> Listeners -> Aggregate Report
Is Your Infrastructure Ready for Global Traffic Spikes?
Unexpected load surges can disrupt your services. With LoadFocus’s cutting-edge Load Testing solutions, simulate real-world traffic from multiple global locations in a single test. Our advanced engine dynamically upscales and downscales virtual users in real time, delivering comprehensive reports that empower you to identify and resolve performance bottlenecks before they affect your users.
More details on how to load test a web server with Apache JMeter.
Save Apache JMeter Results to a CSV file
1. Configure the filename in the Filename field of the Aggregate Report
i.e.: [FULLPATH]/results.csv
where [FULLPATH] is the path on the disk to the directory where you want to save the Apache JMeter results.
2. Run the test script
Result
A file with the results.csv name should now be created at the path specified.
Save Apache JMeter Results to a XML file
1. Go in the Aggregate Report and click the Configure button
2. Check the Save as XML field in the top left corner.
3. Change the extension of the filename to XML i.e. [FULLPATH]/results.xml
Think your website can handle a traffic spike?
Fair enough, but why leave it to chance? Uncover your website’s true limits with LoadFocus’s cloud-based Load Testing for Web Apps, Websites, and APIs. Avoid the risk of costly downtimes and missed opportunities—find out before your users do!
Result
A file with the results.xml name should now be created at the path specified.
Save results to current test script location
If you want to use the current test script location as the destination of your Apache JMeter test scripts, you can follow the below steps:
1. Right click the Thread Group and Add -> Config Element -> User Defined Variables
2. Add a new variable called resultsfile and for the value use the following:
For CSV: ${__property(user.dir)}${__BeanShell(File.separator,)}result.csv
For XML: ${__property(user.dir)}${__BeanShell(File.separator,)}result.xml

(make sure the Save to XML is checkbox checked in the Aggregate Report)
LoadFocus is an all-in-one Cloud Testing Platform for Websites and APIs for Load Testing, Apache JMeter Load Testing, Page Speed Monitoring and API Monitoring!
3. Go to the Aggregate Report and add the ${resultsfile} in the Filename field.
Result
A file with the results.csv or results.xml name should now be created at the path specified.
Dynamic Filenames
In order not to overwrite the result values from the JMeter script, we can append a timestamp to the filename:
For CSV: ${__property(user.dir)}${__BeanShell(File.separator,)}result_${__time(yyyyMMdd-HHmmss)}.csv
For XML: ${__property(user.dir)}${__BeanShell(File.separator,)}result_${__time(yyyyMMdd-HHmmss)}.xml
(make sure the Save to XML is checked in the Aggregate Report)
Apache JMeter note:
Don’t use GUI mode for load testing, only for Test creation and Test debugging!
For load testing, use NON GUI Mode & adapt Java Heap to your test requirements