Introduction
Hey there! If you’re here, you’re probably looking to supercharge your JMeter experience by installing the JMeter Plugin Manager. Whether you’re a business owner, student, developer, or DevOps professional, this guide will walk you through the entire process, making it as smooth and painless as possible. We’ll start with the basics and then dive into more technical details. Ready? Let’s get started!
What is JMeter and Why Use It?
What is JMeter?
Is Your Infrastructure Ready for Global Traffic Spikes?
Unexpected load surges can disrupt your services. With LoadFocus’s cutting-edge Load Testing solutions, simulate real-world traffic from multiple global locations in a single test. Our advanced engine dynamically upscales and downscales virtual users in real time, delivering comprehensive reports that empower you to identify and resolve performance bottlenecks before they affect your users.
Apache JMeter is an open-source tool designed to load test and measure performance. It’s widely used for performance testing on web applications, but its capabilities extend to other services like FTP servers, databases, and more. It’s a versatile tool that’s invaluable for ensuring your applications can handle the load.
Why Plugins Matter in JMeter
While JMeter is powerful out-of-the-box, plugins take it to another level. They add functionalities like advanced reporting, additional protocols, and custom samplers, making your testing more comprehensive and efficient. Think of plugins as apps on your smartphone – they extend JMeter’s capabilities to meet your specific needs.
Think your website can handle a traffic spike?
Fair enough, but why leave it to chance? Uncover your website’s true limits with LoadFocus’s cloud-based Load Testing for Web Apps, Websites, and APIs. Avoid the risk of costly downtimes and missed opportunities—find out before your users do!
Preparing for Installation
System Requirements
Before we dive in, let’s ensure your system is ready. JMeter requires:
- Java: JMeter runs on Java, so you need at least Java 8. Make sure it’s installed and updated.
- Memory: At least 1 GB of RAM, though more is always better.
- Disk Space: Ensure you have enough space for JMeter and the plugins you’ll install.
Downloading JMeter
- Go to the Apache JMeter website: JMeter Downloads
- Download the latest version: Choose the binary file (.zip or .tgz).
- Extract the files: Unzip the downloaded file to a directory of your choice.
- Verify installation: Open a command prompt, navigate to the JMeter bin directory, and run:
jmeter -vYou should see the version information, confirming JMeter is installed correctly.
LoadFocus is an all-in-one Cloud Testing Platform for Websites and APIs for Load Testing, Apache JMeter Load Testing, Page Speed Monitoring and API Monitoring!
How to Install the JMeter
Installing the JMeter Plugin Manager
What is the Plugin Manager?
The JMeter Plugin Manager simplifies the process of managing JMeter plugins. It allows you to easily install, update, and remove plugins directly from within JMeter. No more manual downloads and file placements – it’s all handled through an intuitive interface.
Step-by-Step Installation Guide
- Download the Plugin Manager JAR file:
- Visit the JMeter Plugins Manager site.
- Download the
JMeterPlugins-Manager.jarfile.
- Place the JAR file in the JMeter lib/ext directory:
- Navigate to the directory where you extracted JMeter.
- Find the
lib/extfolder. - Copy the
JMeterPlugins-Manager.jarfile into this directory.
- Launch JMeter:
- Go to the
bindirectory of JMeter. - Open
jmeter.bat(Windows) orjmeter(Linux/Mac). sh jmeter.sh(from command line if installed from the archive).
- Go to the
- Verify the Plugin Manager installation:
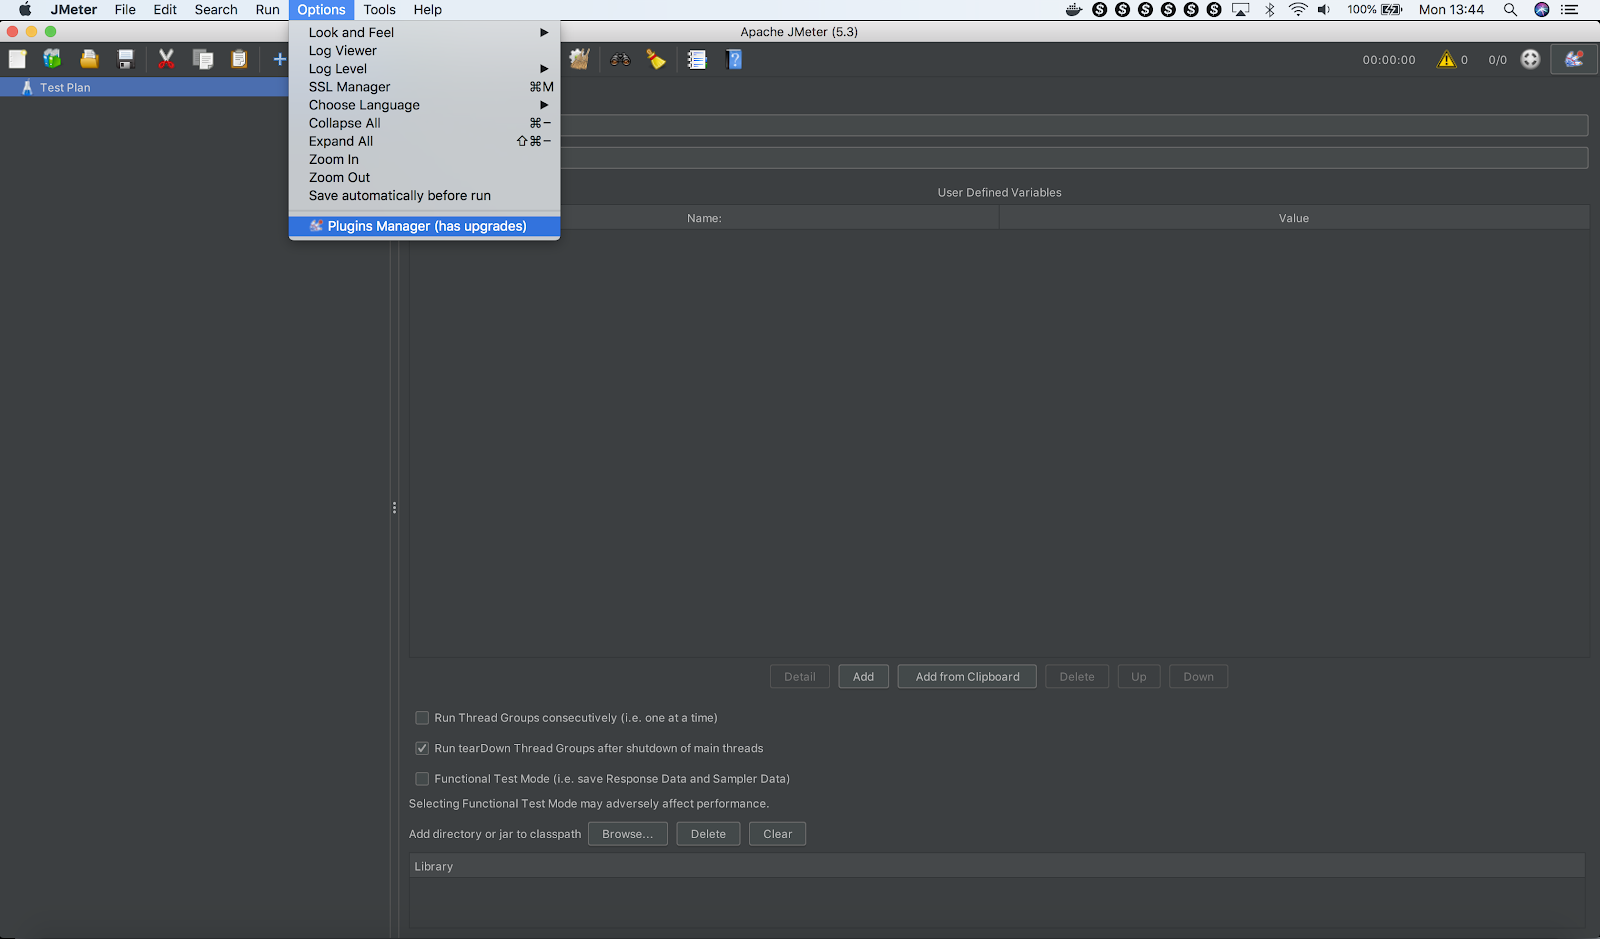
- Once JMeter opens, you should see a “Plugins Manager” option in the “Options” menu.
How to Install the JMeter Plugins Manager
- Check if you have Plugins Manager installed by clicking on the Options menu – see below image:
- If the Plugins Manager is not installed you need to install it by downloading the Plugins Manager JAR file and put it into JMeter’s lib/ext directory. Then start JMeter and go to Options menu to access the Plugins Manager.
- Once installed the Plugins Manager menu item should appear
- Select which plugins you need to install and start testing
- For installing or updating plugins click on Options -> Plugins Manager; clicking on menu item will bring up the plugins manager dialog
Installing Extra Plugins via Plugin Manager
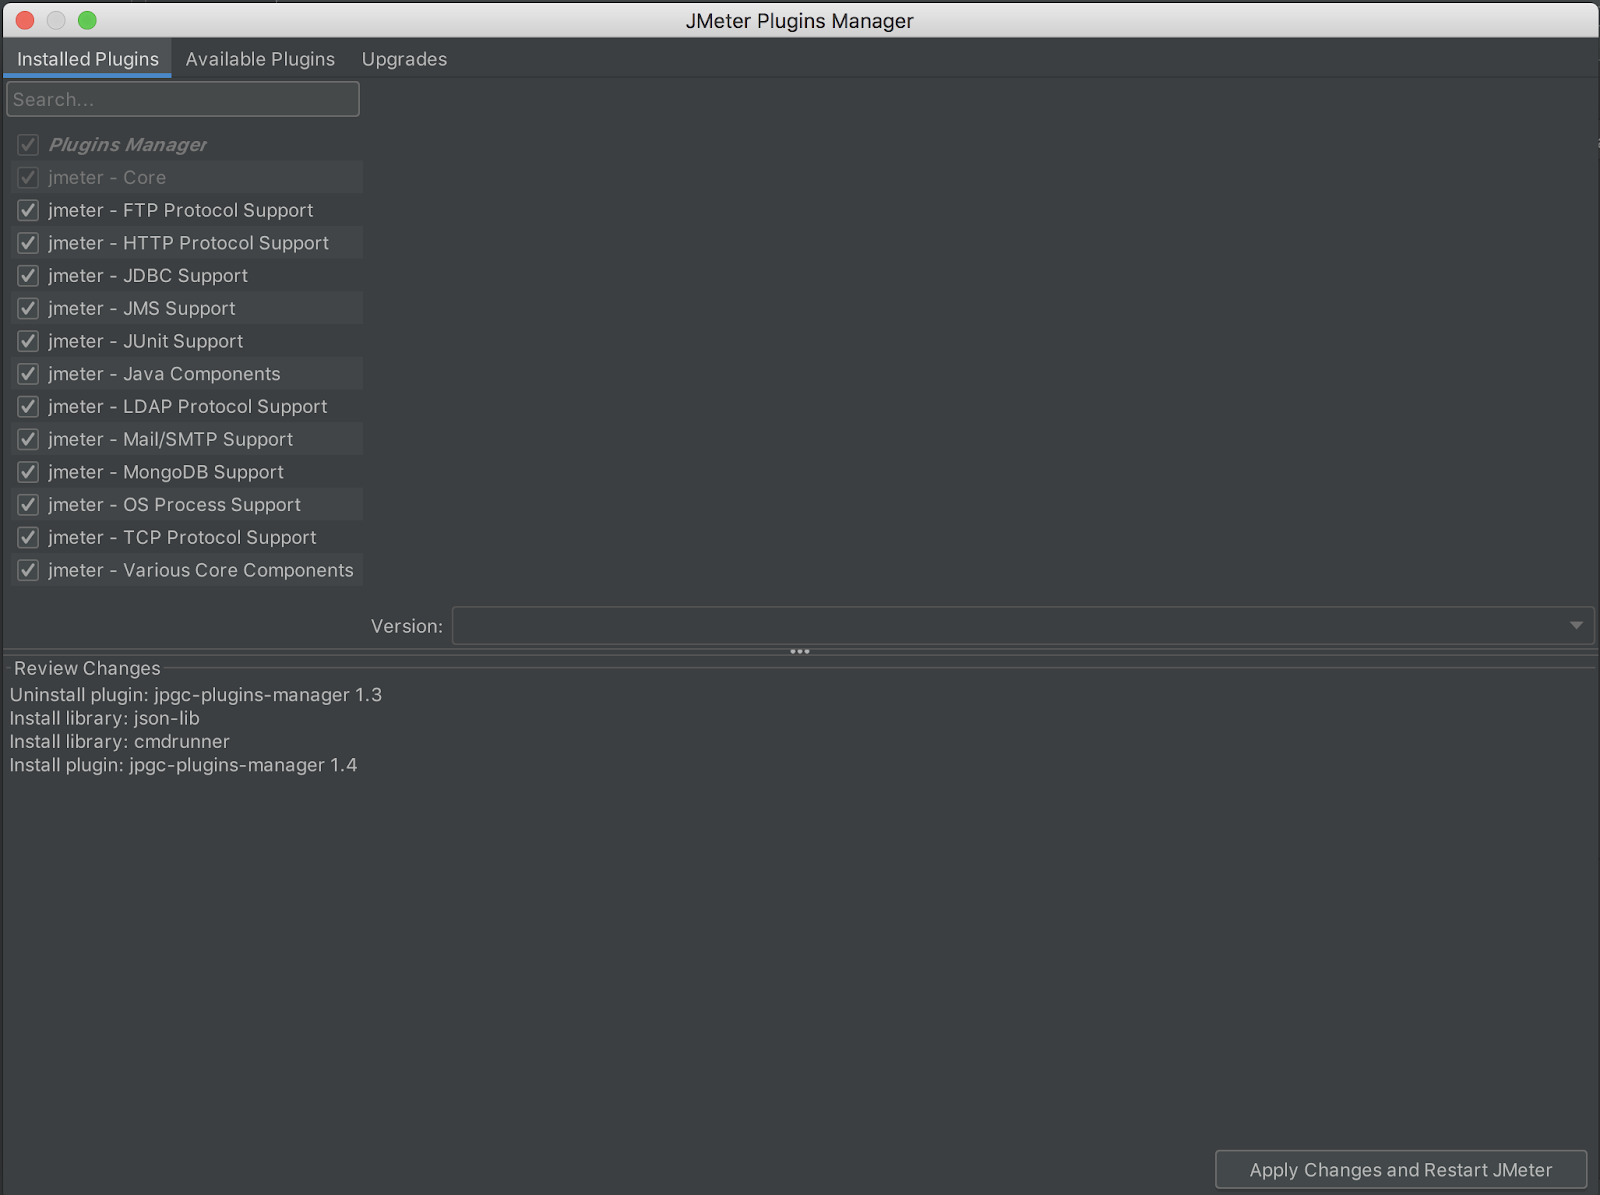
Navigating the Plugin Manager Interface
Now that the Plugin Manager is installed, let’s use it to install some plugins. Open JMeter, and from the “Options” menu, select “Plugins Manager.” You’ll see a window with several tabs: “Available Plugins,” “Installed Plugins,” and “Updates.”
Installing Plugins
- Browse available plugins:
- In the “Available Plugins” tab, you’ll find a list of plugins you can install.
- Select and install plugins:
- Check the box next to the plugins you want to install. For instance, if you need advanced reporting, select the “Custom Plugins” plugin.
- Click the “Apply Changes and Restart JMeter” button.
- Example Plugin Installation:
- Let’s install the “jpgc-casutg” plugin for advanced user scenarios.
- Find “jpgc-casutg” in the list.
- Check the box next to it.
- Click “Apply Changes and Restart JMeter.”
- Let’s install the “jpgc-casutg” plugin for advanced user scenarios.
Verifying Plugin Installation
After JMeter restarts, go back to the “Plugins Manager” and check the “Installed Plugins” tab. Your newly installed plugins should be listed there. Additionally, you can check the menus in JMeter to see new options and functionalities added by the plugins.
Troubleshooting Common Issues
Common Installation Issues
Sometimes things don’t go as planned. Here are some common issues and their solutions:
- Plugin Manager not showing up:
- Ensure the
JMeterPlugins-Manager.jarfile is in the correct directory (lib/ext). - Restart JMeter.
- Ensure the
- Plugins not installing:
- Check your internet connection.
- Make sure you have write permissions to the JMeter directory.
- Verify Java is installed and updated.
Advanced Tips and Best Practices
Optimizing JMeter with Plugins
Selecting the right plugins is crucial for optimizing JMeter’s performance. Here are some tips:
- Identify Your Needs: Choose plugins that align with your testing requirements.
- Keep Plugins Updated: Regularly check for updates to ensure you have the latest features and bug fixes.
- Limit Plugins: Only install necessary plugins to keep JMeter lean and efficient.
Case Studies
Real-world examples can provide insight into the practical benefits of JMeter plugins. Here are a couple of case studies:
- E-commerce Load Testing: A major e-commerce company used JMeter plugins to simulate thousands of users, ensuring their website could handle peak traffic during sales.
- API Performance: A fintech startup employed JMeter plugins for API testing, identifying bottlenecks and improving response times by 30%.
Conclusion
We’ve covered a lot of ground, from understanding JMeter and its plugins to installing the Plugin Manager and adding extra functionalities. Plugins are a game-changer, making JMeter more powerful and versatile. Whether you’re a business owner ensuring your website can handle traffic or a developer fine-tuning your application, JMeter plugins can provide the tools you need.
Additional Resources
Useful Links
FAQs
LoadFocus
By the way, if you’re into website performance, load testing, or performance testing, you might want to check out LoadFocus. They offer easy-to-use cloud-based testing solutions that integrate seamlessly with JMeter. It’s a great way to enhance your testing capabilities without the hassle of managing infrastructure. Happy testing!
How to Get Plugin Manager in JMeter?
To get the Plugin Manager in JMeter, download the JMeterPlugins-Manager.jar file from the JMeter Plugins Manager site and place it in the lib/ext directory of your JMeter installation. Restart JMeter, and you should see the Plugin Manager option in the “Options” menu.
What Are Plugins in JMeter?
Plugins in JMeter are additional components that extend its core functionality. They can add new samplers, listeners, timers, and other elements to enhance your testing capabilities.
What is a Plugin Manager?
The Plugin Manager in JMeter is a tool that allows you to easily manage (install, update, and remove) JMeter plugins from a central interface. It simplifies the process of enhancing JMeter’s functionality without manual downloads and file placements.
How to Create a Plugin for JMeter?
Creating a plugin for JMeter involves writing Java code to extend JMeter’s functionality. You need to implement specific JMeter interfaces and compile your code into a JAR file. Detailed guides and documentation are available on the JMeter Plugins website.
How Do Plugins Work?
Plugins work by integrating with JMeter’s core system to provide additional functionalities. They can introduce new elements, such as samplers or listeners, that can be used within your JMeter test plans to achieve more complex testing scenarios.
What Are the Three Types of Plugins?
The three types of plugins in JMeter are:
- Samplers: Add new types of requests or actions.
- Listeners: Provide different ways to visualize or store test results.
- Config Elements: Offer additional configuration options for your test plans.
How to Add Scripts in JMeter?
To add scripts in JMeter, you can use the BeanShell Sampler, JSR223 Sampler, or other scripting elements within your test plan. These allow you to write custom code in languages like BeanShell, Groovy, or JavaScript to enhance your testing scenarios.
How Do I Get Plugin Editor?
The Plugin Editor is part of the JMeter Plugins Manager. You can access it by installing the Plugin Manager and then selecting the desired plugins from the “Available Plugins” tab within the Plugin Manager interface.
Where Do I Run JMeter Script?
You run JMeter scripts from the JMeter GUI or in non-GUI mode from the command line. For GUI mode, open JMeter and load your test plan. For non-GUI mode, use the following command:
jmeter -n -t /path/to/your/testplan.jmx -l /path/to/results.jtl
How to Add JMeter Plugin to Jenkins?
To add a JMeter plugin to Jenkins, you need to integrate JMeter with Jenkins using a plugin like the Performance Plugin. Configure your Jenkins job to run JMeter tests and include the necessary JMeter plugin JAR files in your Jenkins project.
That’s it! With this comprehensive guide, you’re all set to install the JMeter Plugin Manager and start enhancing your JMeter tests with powerful plugins. Happy testing!